Friday, June 22, 2012

My DIY Play Kitchen - How much did it cost?

I kept all of the receipts for things that I bought for the play kitchen, so I would have a grand total when I finished. Here is the list. 

Dollar Tree 
dish towel $1
muffin pan $1
cookie pan $1
round cake pan $1
total $4.20 

Family Dollar 
spray paint $1.45
spray paint $1.45
total $3.05 

Family Dollar 
11x14 frame $5
utensil set $1
spray paint $1.45 
total $7.82 

Goodwill
rack for utensils $1.99 
wood bread box $5.99
total $8.38 

Marden's 
handle $.49 
fabric $3.49 
total $4.18 

Kmart 
cabinet knob $4.49
metal bowl $6.99
wire shelf $8.98 
march of dimes $1
total $22.48 

Walmart 
dowel $.57
dowel $.57
dowel $.87 
spray paint $4.34
total $6.67 

Walmart 
dowel $.57 
super glue $5.67 
total $6.55

Home Depot 
hinges $2.79
knob $1.88
magnetic catch $1.79
hinges $5.88
shelf brackets $3.88
total $17.03 

Home Depot 
bathroom faucet $24.86 
plywood $5.68
hardboard $9.18
total $41.71

TOTAL for all supplies $122.07 

I really splurged on the faucet, and I got some things I didn't end up using, so I could have done it cheaper, but I couldn't have bought a similar one for anywhere near this price. I had fun, but it was more work and money than I set out for it to be. 

Tuesday, June 19, 2012

My DIY Play Kitchen


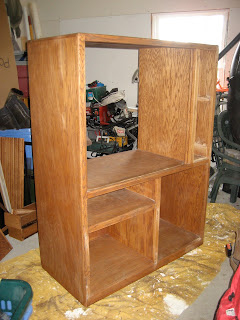
I'd seen a lot of cool DIY play kitchens on Pinterest and decided that I needed to make my own! I love the idea of repurposing old furniture, and I love projects. My grandmother had this old entertainment center that she wasn't using, so I asked if I could have it and transform it into a play kitchen. She said yes! Thanks Grammy :) This project took a lot longer than I planned, I didn't actually have experience using power tools, and I changed my mind several times along the way, but I think it came out pretty awesome!
First I took all of the doors off and sanded it down. 
Then I primed it with some left over ceiling paint/primer that I found in the basement. 
Then I decided to take out the narrow vertical cupboard wall. 
Then I bought a piece of fiber board. I had my husband cut it to sit the back and nail it on. Then I painted that with primer too. Then my mother-in-law pointed out that the top of the sink and oven would be too high for the kids to play on so...I took a sawzall and cut a few inches off of the middle wall. Then I pounded the top shelf area with a hammer until it the nails came out. Then I pulled it out and flipped it over. The other side was much smoother and only had one groove in it. Then I hammered it down and primed it. Everyone told me not to do this and that it was completely crazy and might ruin the whole kitchen, but I was determined to build it to the right height for the kids to play with! 
I primed the cabinets and shelf and had my husband cut a piece of MDF from Home Depot to fit as the oven door. Then I primed one side and painted the other side of it with some magnetic paint that we had lying around in the basement. 
I found a large double wire rack at K-Mart and spray painted it black for the oven. I also found a handle a Marden's and spray painted that black for the oven door. 
I found this awesome metal mixing bowl at K-Mart and looked all around for a cheap faucet, and ended up buying a bathroom faucet at Home Depot. I really wanted the sink to look good! 
Then I waited for my husband to cut a hole for the sink bowl & faucet...and waited...and waited...and finally he cut it! 
I got some cheap black spray paint and painted the inside of the oven. 


I used paper and masking tape to stencil squares for the burners and sprayed them black. 
Then I had Derek cut the sliding doors to use as a backsplash. I nailed the side pieces on, but the back pieces had to be superglued because the back panel is so thin. 

I found a nice piece at a thrift store to hang the spoons and spatulas on. I painted that white and attached it to the kitchen wall. Then I decided to paint the wood backsplash white. It was starting to look a little too white...
 So, I decided to paint the walls a tan color that we had leftover in the basement. I enlisted the help of my friend Jon to drill holes for the faucet and attach the shelf with brackets. I also attached the oven door hinges, handle, magnetic catch and knobs that I had sprayed black. I had my husband cut wood dowels, and I sprayed them black then glued them onto the burner squares to make the burners look more realistic. Then I had Jon use some of the wood dowels to make a towel bar and I attached that to the wall with screws. 

Way better with the tan, right?! 
Then I attached the cabinet doors and made a window using a picture frame, picture from an old calendar, wood dowel painted black, screw in hooks and curtains I sewed out of some cheap red checked fabric. 

 Dom enjoying his new kitchen! It is a little big for him, but he will grow into it! 


                    Before and After


Sunday, April 29, 2012

gDiapers update

I have been crazy busy lately, but I have still been using the gDiapers all day and disposables at night. I just had to get some more gDiapers snap-in liners because they had lost some of their elasticity and they were leaking. I got 12 originally, and I had to replace them about 2 1/2 months later, so you can expect $40 every 2 1/2 months. The gCloth liners are about $8/box and they last about 2 weeks, I buy them 2 boxes at a time, so I spend $16/month on those. I used to spend about $38/month on disposables at Target, so it isn't really saving me that much money. I'm going to try to rinse the snap-in liners instead of washing them on warm in the machine with bleach every time to make them last longer. I'm hoping it works, but even if I don't save money and just break even, I feel better using cloth diapers and knowing that there are a lot less diapers going into landfills.

Sunday, March 4, 2012

Days 10 through 15 - gDiapers

I'm at the end of week two, and I'm still liking the cloth diapers. They are a little more work than disposable diapers, but I've discovered some tips over the past couple of weeks that help.


Gerber pre-folded cloth diapers are great burp cloths, but lousy diaper inserts.
I used the Gerber pre-folded cloth diapers as burp cloths all the time when my baby was exclusively breast fed, and they were my favorite burp cloths. My son was a "happy spitter," he was totally happy and gained weight, but he spit up a lot, so I needed really absorbent burp clothes. I gave the Gerber pre-folded diapers a try as inserts for the gDiapers because I read that others have used them with success, I found them to be very absorbent for spit up, and they are cheaper than the gCloth inserts. I found them to be very prone to leaks.  I don't know if it was just because they aren't exactly the right size for the gDiapers, but I won't be using them again!

Buy at least 2 days worth of diaper inserts and snap-in liners.
I started out with 6 snap-in liners, and I had to do laundry daily. Now I have 12 snap-in liners and I still do a load of diaper laundry almost daily because I don't like to let them sit for too long. I do find it nice not to have to do a load of laundry every day though. It takes the pressure off if I miss a day for one reason or another. I currently have 12 diaper inserts which is just about enough for 2 days. I will probably get some more because they are size medium/large, so I can reuse them for my next baby and for longer!

Check cloth diapers more frequently than you would disposable!
This seems pretty obvious I guess but cloth diapers are harder to check than disposable diapers. You can't just squeeze them and feel if they are wet. You have to open them up and look! The times that my son had leaks were when he had gone more than 2 or 3 hours without a diaper change. This isn't usually the case, but it happens depending on naps or if we are in the car. The gCloth liners work pretty well except when they are wet before they get dirty. They break down kind of like toilet paper when they get wet, which is why they are flush-able, so it makes sense. The messiest diapers I've have to clean were really wet and dirty, so if you get to the wet before they get dirty it isn't so bad.

You can use cloth diapers overnight...if you double up on inserts.
I was pretty low on disposable diapers when I started using cloth diapers, but I figured that they would last me a while since I was only using them overnight. They lasted over a week, but I did run out eventually, and I didn't get a chance to pick some up before bedtime. I had read that doubling up on the gCloth inserts helps prevent leaks if you put them hemp side together (some refer to it as a "hemp sandwich"). The liquid is absorbed by the hemp side, so if you put them together then the wetness stays off of babies bottom and off of the snap-in liner. It works so well that I would do it all the time, but it makes the diaper very bulky! My son had a hard time walking around in the double insert diaper, so I will only do it if he is sleeping or in his car seat.

That's all for now. It's bedtime for this Mama!

Monday, February 27, 2012

Day 7, 8, & 9 - gDiapers

We left the house Friday at about 4:45PM for Millinocket. We stopped on the way and got some groceries  for the weekend and Pizza Hut cheese breadsticks for dinner...yum! We arrived at the cabin a little before 8:00PM, and Dom had slept the whole way! I put a disposable diaper on him before I put him in the car because I knew it would be a long ride. When we got to the cabin, I put a cloth diaper on Dom for the hour before he went back to sleep, then changed into a disposable diaper before bedtime.

Saturday morning we got up early to go ice fishing. Dominic had four nasty dirty diapers during the day, so four of the snap-in liners were too soiled to be reused. I could have washed them in a basin, but the lake was covered in 19 inches of ice, melting snow is very time consuming and the water is so dirty! We brought some water for drinking, but I wanted to try to save as much as possible, incase we got trapped at the cabin. 

I brought 6 little gPants, 6 snap-in liners, 12 cloth inserts, 12 cloth liners and 8 disposable diapers. I was hoping that I would be able to reuse the snap-in liners and gPants on Sunday, but I was down to 2 snap-in liners, so I was a little nervous. Dom got another snap-in liner too dirty to reuse, but luckily we decided to head home early on Sunday morning. I put a disposable diaper on Dom before we got in the truck. When we drove into the cabin, there was about 6 inches of snow on the "driveway." It snowed while we were there, so it was more like a foot when we left. The truck made it in great...getting out was not so great. Six men, a jeep, a truck, a snowmobile, and 2 1/2 hours later we were on the road again. 

We got home around 2:00PM on Sunday and there was a box from diapers.com waiting for me! Six more little gPants (3 blue and 3 taupe), each with a snap-in liner were in the box and I was pretty excited. I did a load of diaper laundry right away, but with the extra snap-in liners, I should now be able to do diaper laundry every other day. Hooray! 


Friday, February 24, 2012

Day 5 & 6 - gDiapers


Over the past couple of days I've really gotten used to using gDiapers and other people around the house have tried them out too. My mother-in-law says that she doesn't love the fit, which I get because they fit very different from disposable diapers. I think that the fit takes some getting used to, but I think it has something to do with preventing leaks. I haven't experienced a single leak, and I'm starting to think that gDiapers are more leak proof than disposable diapers!


My husband has tried them out a few times, and one of the times he pulled one of the tabs off! I've read about this happening on reviews of gDiapers, so I expect that it will happen from time to time, but it was very easy to sew back on, so it didn't deter me from using them. I overheard my husband talking to a friend on the phone about the gDiapers, and he said something like they are cool underwear type things. That's positive so I'll take it for now :)

(Here is a close up of a tab like the one that got ripped off of the gDiaper.)

I've been doing a load of diaper laundry every day so far, mostly because I need some more snap-in liners. I don't wash them every time they are used, but I only have six, so I really only have enough for one day. Luckily for me, my mom ordered 6 more little gPants and they each come with a snap-in liner, so I should be able to change the frequency of diaper laundry to every other day.

I wash the gCloth inserts and snap-in liners in warm water with perfume and dye free detergent. The inserts are very absorbent so they take a while to dry, sometimes I have to dry them twice. The snap-in liners are air-dry only and they air dry quickly. I have only had to wash the little gPants when they got dirty on the outside, from food or whatever else Dom gets all over himself if he isn't wearing pants. I have washed the little gPants with regular clothes or in the diaper laundry and both have worked fine. I plan on washing the little gPants weekly since they each only get used about once a day.

My little family is going to be up north for the weekend without any running water. I've washed all of the soiled cloth diaper parts to bring with us, and I'm bringing some disposable diapers...just in case. Check back on Monday to see how it went!

Wednesday, February 22, 2012

Day 4 - gDiapers

We keep diapers for daycare in this frog downstairs in the playroom. We write the child's first initial with permanent marker on a few of their diapers and bring them downstairs. I put a few of Dom's cloth diapers (all put together) and a ziploc bag with his name on it in the frog. When I change Dom's diaper in the playroom, I put the soiled diaper parts into the ziploc bag to wash, and I keep the other parts in a pile to bring upstairs and refill. This is really easy to do and not much more time consuming than changing a disposable diaper.


This is only day 4 of the cloth diapers, but so far I'm wondering why I didn't try this sooner. Diapers are expensive for one and two, they don't break down very easily. I've read some articles that state that the first disposable diapers ever made are still sitting in a landfill. I hope that's not the case, but either way I feel much better about reducing the amount of disposable diapers that are going into landfills.